Music Distribution
Spotify LUFS Analysis: How Loud Your Mix Should Be in 2026

Nadav Peleg
Updated · 12 min read
Spotify recommends mastering at -14 LUFS, but most artists master much louder. Here's what LUFS actually means for your mix and how to get it right.


On this page
- How Spotify's Loudness Normalization Actually Works
- Spotify LUFS Analysis: What the Top Tracks Actually Measure
- Why Spotify's -14 LUFS Recommendation is the Wrong Target for Independent Artists
- The Dynamic Range Trick That Makes Your Drop Hit Harder on Spotify
- The Real Source of Loudness on Spotify (It's Not Your Limiter)
- How to Check Your Track with Loudness Penalty Before You Upload
- The Spotify Mastering Checklist: What to Hit Before You Upload
- The Actual Target
- Frequently Asked Questions
According to ITU 1770 standard, mastering at -14 LUFS is recommended on Spotify.
I’ve seen artists doing -8.4 to -9.5 Spotify LUFS on average.
That -4.5 to -5.6 dB gap is not a coincidence. It’s the difference between following the official guideline and understanding how loudness normalization actually works.
On this page, I’ll show you what it takes to hit the right LUFS level for your track.
Why should you listen to me? Before I started SoundCampaign, I was a music producer. Today I run a music tech company working with artists and releases every day, so I’ve spent years analyzing what actually works on streaming platforms.
How Spotify's Loudness Normalization Actually Works
Spotify measures your track's integrated LUFS (loudness over the full duration of the file) and compares it to a target level.
On the default "Normal" playback setting, that target is -14 LUFS. On "Loud," it's -11 LUFS. On "Quiet," it's -19 LUFS.
Here's the mechanic that matters:
When your track is louder than the target, Spotify turns it down. If your track is quieter than the target, Spotify does not turn it up. That asymmetry changes everything.
If you master at -8 LUFS, Spotify turns your track down 6 dB to reach -14. If you master at -14 LUFS, nothing happens. Your track plays at -14 LUFS either way. But the -8 LUFS master has more density, more compression, more saturation baked into the signal before that 6 dB reduction. A louder master turned down still sounds more energetic than a quiet master left alone.
According to iZotope, 87% of Spotify users keep normalization on its default setting.
You are not designing your master for the 13% who turned it off. You're designing it for the normalized experience, which means the floor is fixed. What wins is what's happening inside the signal, not just its peak loudness.
On true peak, Spotify recommends -1 dBTP (true peak), or -2 dBTP if your master is louder than -14 LUFS.
This exists because Spotify transcodes your upload to OGG Vorbis at 320kbps, and inter-sample peaks can clip during that conversion.
The reality of major label releases is different. Most chart-topping tracks hit 0.0 to +1.3 dBTP. The pros know their encoders.
Spotify LUFS Analysis: What the Top Tracks Actually Measure
The most important data we have is from MasteringTheMix, who analyzed the top 25 Spotify tracks of 2022. The average integrated LUFS across those tracks was -8.4 LUFS integrated. Not -14. Not -12. Not even -10.
From the Billboard Hot 100, the specific measurements tell the same story.
- Harry Styles "As It Was" measured at -5.6 LUFS integrated
- Adele's "Easy On Me" measured at -9.4 LUFS
- BTS "Butter" came in around -7 to -8 LUFS
These are not edge cases. These are the biggest commercial releases of the year.
I analyzed Spotify LUFS levels across hundreds of tracks and noticed clear loudness patterns by genre.
EDM or Dubstep tracks regularly hit -4.2 to -7.1 LUFS. Hip-hop and trap landed in the -7.3 to -9.4 LUFS range. Pop clustered between -7 and -9.6 LUFS.
Even ambient music, the genre most associated with quiet dynamics, measured louder than -14.
Let me show you some numbers that come from the actual track measurements, not from Spotify's documentation.
|
Genre |
Measured LUFS Range |
True Peak Range |
|---|---|---|
|
Pop / Top 40 |
-5 to -9 LUFS |
0 to -1 dBTP |
|
EDM / Electronic |
-4 to -9 LUFS |
0 to -0.5 dBTP |
|
Hip-Hop / Trap |
-7 to -9 LUFS |
0 to -1 dBTP |
|
Bass / Dubstep |
-4 to -6 LUFS |
0 dBTP |
|
Rock |
-8 to -10 LUFS |
-1 dBTP |
|
Ambient |
-10 to -13 LUFS |
-2 to -3 dBTP |
|
Jazz / Classical |
-12 to -18 LUFS |
-3 to -6 dBTP |
|
Acoustic / Singer-Songwriter |
-12 to -16 LUFS |
-3 dBTP |
Why Spotify's -14 LUFS Recommendation is the Wrong Target for Independent Artists
Look, that -14 LUFS number comes from EBU R128. It’s a European broadcasting standard designed for television so that shows and ads don’t blast your ears.
Then streaming platforms picked it up as a baseline. Suddenly, everyone treated it like the holy grail for mastering.
It’s not a target to compete for. It’s just the minimum for broadcast rules.
Spotify’s loudness normalization only turns down tracks louder than that. It never boosts quieter ones. So if you master right at -14 LUFS, you’re just sitting on the edge where normalization starts. No extra points for you.
That whole “same perceived loudness” story got a hole in it.
When Spotify lowers an -8 LUFS track by 6 dB to hit -14, it’s just cutting volume. It doesn’t mess with how dense, compressed, or punchy the track feels.
So a thick, compressed, saturated track originally at -8 LUFS still sounds fuller at -14 than a track made to be -14 from the start.
Now, there’s a real exception, such as jazz, classical, acoustic, folk, ambient. Those genres live on their dynamics. For them, the -14 rule makes sense. But treating it like the stand for everything else is what messed up the scene for years.
The Dynamic Range Trick That Makes Your Drop Hit Harder on Spotify
Spotify measures integrated LUFS across the full duration of the track.
A song with a 30-second quiet intro, a verse at medium density, and a loud chorus gets measured as an average of all of those sections.
If your track has a 30-second intro at -25 LUFS followed by a chorus section at -6 LUFS, the integrated average might land around -12 LUFS.
Spotify targets -14 Normal, so it turns your track down 2 dB. Your chorus hits at -8 LUFS during playback.
If your track is a constant -8 LUFS from start to finish, Spotify turns it down 6 dB. Your chorus hits at -14 LUFS during playback.
Same genre, same loudness intention. The track with the quiet intro gets 6 dB more playback level on the loud section.
That's the difference between a drop that moves the room and one that doesn't.
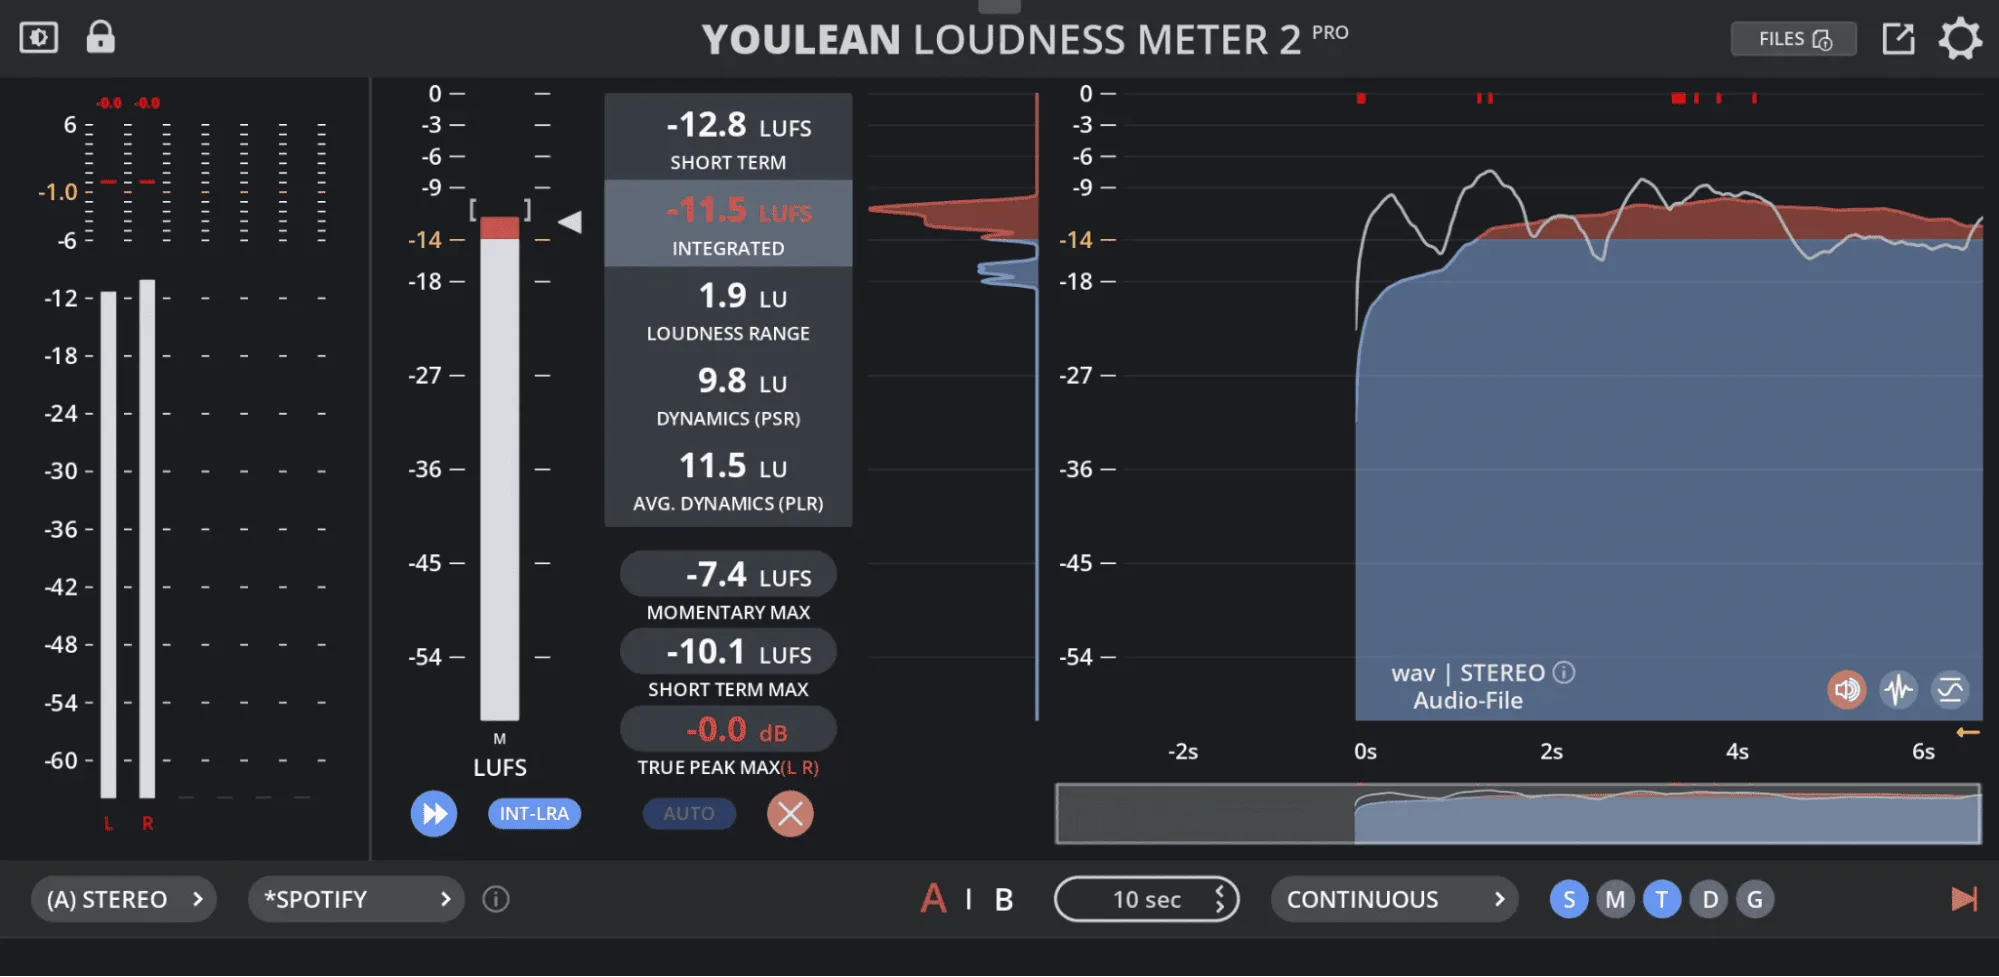
This only works if the quiet section is musical. A fake -30 LUFS silence pad at the start of a club track sounds exactly like what it is. But if your genre or arrangement naturally includes quieter sections, understand this quantitatively, not just artistically. Use Youlean Loudness Meter in your DAW to monitor integrated vs short-term LUFS before you export. That always works.
The Real Source of Loudness on Spotify (It's Not Your Limiter)
Most producers think loudness comes from smashing the limiter at the end. That’s not it.
The limiter just adds the last bit of level. The real loudness comes from what you build earlier, density, frequency balance, and dynamics.
Here’s what actually makes your mix sound loud:
Mix density: The most important factor. A track with a 3 dB difference between average and peak energy sounds fuller than one with 6 dB, even if both hit the same -14 LUFS after normalization. The denser mix feels way more present.
Frequency balance: It changes loudness perception a lot. Energy in the 2-6 kHz range makes a mix sound louder than bass or airy highs at the same LUFS. If your mix is heavy on sub-bass, it will measure loud but come off quiet on most speakers.
Transient shaping: Faster attacks and longer releases make the kick’s body pop without boosting the peak. It’s about shaping, not just pushing levels.
Harmonic saturation: This adds extra harmonics that trick our ears into hearing more loudness without spiking peaks. Using tape or tube saturation on channels gives your mix energy that meters don’t fully catch.
If your tracks sound quiet on Spotify and you’ve been cranking your limiter ceiling, you’re focusing on the wrong thing. Go back to your mix and build loudness there.
How to Check Your Track with Loudness Penalty Before You Upload
Loudness Penalty is a free browser-based tool built by MeterPlugs and mastering engineer Ian Shepard.
Drag and drop your audio file (it never gets uploaded or stored, all analysis happens in your browser) and it shows you the exact dB penalty your track will receive on Spotify, YouTube, Tidal, Apple Music, and Pandora.
Negative number = your track is louder than the platform target and will be turned down. Positive = your track is quieter than the target.
If you run your master through Loudness Penalty and get a 0.0 or positive number on Spotify, your master is at or below the normalization floor. For pop, EDM, or hip-hop, investigate whether the mix is dense enough, not just the limiter ceiling.
The Spotify Mastering Checklist: What to Hit Before You Upload
You’re about to drop your track on streaming platforms. Cool. But hold up, there are a few technical things you gotta check first.
These help your master sound solid after all that encoding and loudness normalization Spotify throws at it. Here’s what I follow in my mastering workflow.
Hit the Right LUFS for Your Genre
Spotify normalizes playback loudness, but that doesn’t mean you should master every track to the same LUFS. Different genres call for different loudness targets.
Heavy electronic stuff usually goes louder. Acoustic or jazz is something I’d keep chill with more dynamic range.
This chart might help you:
|
Genre |
Typical Integrated LUFS Range |
|---|---|
|
Pop / EDM / Hip-Hop |
-7 to -9 LUFS |
|
Hard EDM / Bass Music |
-4 to -6 LUFS |
|
Rock |
-8 to -10 LUFS |
|
Jazz / Classical / Acoustic |
-12 to -18 LUFS |
Spotify aims to play tracks around -14 LUFS, but don’t get it twisted. If you master hip-hop at -14 LUFS, your track might sound thin compared to others in that scene. So, know your genre and adjust accordingly.
Keep True Peak Around -1 dBTP
Spotify converts your files into compressed formats like OGG Vorbis. This process can cause clipping if you’re not careful.
Set your true peak ceiling to about -1 dBTP. Why? Because even if your file looks clean, peaks above 0 dBTP can distort after encoding. Trust me, clipping sounds ugly.
Check Loudness Penalty Before You Upload
Use tools like Loudness Penalty to see how much Spotify will turn down your track during normalization.
Here’s what you’ll usually see:
- Pop and EDM tracks often get turned down by 5 to 8 dB.
- If the penalty is super low or zero, your track might be quieter than usual for the genre.
This isn’t a pass or fail. It just tells you how your track will behave once it hits streaming.
Use Your Track Structure to Your Advantage
Integrated LUFS measures loudness over the whole track. That means quiet parts drag down the average.
Think about:
- Quiet intros
- Ambient breaks
- Long fades
These can lower your overall LUFS, letting you have louder sections later without pushing the whole track’s loudness too high. Smart producers use this trick all the time.
Fix Loudness in the Mix, Not the Limiter
If your master feels quiet even when the LUFS number is high, don’t blame the limiter.
Loudness mostly comes from your mix. Look at things like:
- Parallel compression on drums
- Harmonic saturation on bass or synths
- Balanced frequencies, especially in the upper mids
The limiter just adds the last bit of volume. It can’t fix a weak mix.
Export High-Res Masters for Distribution
When you’re ready to bounce your final master, go high-res.
I recommend:
- 24-bit WAV files
- 44.1 kHz or 48 kHz sample rate
24-bit gives you more headroom and detail than 16-bit. That extra quality helps when streaming platforms convert your track. Don’t skimp here.
That’s your checklist. Nail these points and your track will survive Spotify’s loudness jungle without losing its punch.
The Actual Target
Spotify says -14 LUFS is the sweet spot. But, now we know how certain artists break that rule.
That -14 number is a broadcast standard that somehow sneaked into music production without anyone questioning it.
If you’re an indie artist aiming for mainstream playlists, -14 is just the minimum where Spotify’s normalization kicks in. It’s not a magic number that makes your track sound better.
You need to master your genre’s vibe. Look at how loud tracks in your style actually are. Fix loudness problems in the mix itself, not by cranking the limiter ceiling.
Don’t chase Spotify’s recommendation blindly. Focus on what your genre sounds like in real life.
Frequently Asked Questions
What LUFS should I use for Spotify?
It depends on your genre. Pop, EDM, and hip-hop tracks on major playlists measure between -7 and -9 LUFS integrated. Hard EDM and bass music regularly hits -4 to -6 LUFS. Jazz and classical can be -12 to -18 LUFS. Spotify's official recommendation of -14 LUFS is a broadcast compliance floor, not a competitive mastering target for most genres.
Does Spotify normalize LUFS and turn tracks up if they're too quiet?
No. Spotify's normalization is asymmetric. It turns loud tracks down to match its target, but it does not turn quiet tracks up. If your track is quieter than -14 LUFS on the Normal setting, Spotify leaves it at that level, meaning it plays back quieter than everything else on the playlist.
Does mastering louder help if Spotify just turns it back down?
Yes, because loudness comes from mix density, not peak volume. A -8 LUFS master turned down 6 dB to -14 still retains its compression, saturation, and transient energy. A track mixed and mastered to -14 from scratch has less density. They both play at -14 LUFS but they do not sound the same.
What is true peak and what dBTP should I target for Spotify?
True peak (dBTP) measures inter-sample peaks, the actual peak level the audio hits after digital-to-analog conversion. Spotify transcodes your upload to OGG Vorbis, and inter-sample peaks can clip during that process. Spotify recommends -1 dBTP. For independent releases, -1 dBTP is the safe ceiling. Most major label releases push to 0 or above because they control the full encoding chain.
What tool can I use to check how Spotify will treat my track before uploading?
Loudness Penalty is a great free, browser-based tool. Drag and drop your master and it shows the exact dB penalty on Spotify, YouTube, Tidal, Apple Music, and Pandora. For real-time monitoring in your DAW during mastering, use Youlean Loudness Meter. That's what I personally use as well.

Founder & CEO at SoundCampaign
I'm Nadav. I made music before I built any of this, and that's really where the interest in marketing came from. The analytics side is the part I like most: where streams come from, what moved, and what didn't. I founded SoundCampaign to give artists exposure that's actually real. It took far more time and effort than I planned for, and that part hasn't changed much.
Promote your music
Real playlist placements, TikTok videos & Meta ads

Trusted by 100,000+ artists & labels
No bots, ever.

Real case study
How SoundCampaign Put Grant Knoche in Front of 460,587 Listeners for WOOHOO
Read the full story
Ready to get your music heard?
Join thousands of independent artists using SoundCampaign to reach real playlists, creators, and fans, with honest feedback every step of the way.
- No bots, ever
- Artist Protection ProgramIf a curator or creator doesn’t review your track, we credit you back. Your budget is always protected.
- Keep 100% of your royaltiesWe’re a promotion service, not a label. We never take a cut of your streams or royalties.